
This post is also available in:
 Deutsch (German)
This guide shows you how to go live on FansyMe with a streaming app on your Mac or Windows computer. First you get your stream key from FansyMe. Then you put it in OBS (or SplitCam / XSplit). You can stream only to FansyMe, or to FansyMe and other sites at the same time (multistream).
Note: the screenshots in this guide may look a little different on your computer (Mac or Windows, or a newer app version). The steps and button names stay the same.
Before you start #
You need 3 things:
- A FansyMe creator account (verified).
- A Mac or Windows computer with a camera and microphone.
- A good internet connection. Use a cable (Ethernet) if you can. Wi-Fi is OK but less stable.
Test your internet speed first #
- Open speed.cloudflare.com in your browser.
- Wait until the test is finished.
- Look at the Upload number. This is the most important number for streaming.
- Take a screenshot of the result.
Need help? Send us this screenshot when you contact support. It helps us find the problem much faster.
| Your upload speed | What you can do |
|---|---|
| Less than 5 Mbps | Stream at 720p, bitrate 2500-3000 |
| 10 Mbps or more | Stream at 1080p, bitrate 5000-8000 |
| 20 Mbps or more | 1080p + multistream to 1-2 more sites |
Simple rule: your upload speed should be about 1.5x your total bitrate. Example: 6000 kbps = 6 Mbps, so you need about 9 Mbps upload.
Step 1 – Get your stream key from FansyMe #
- Go to the FansyMe homepage or the New Post page.
- Click the orange Go Live button.
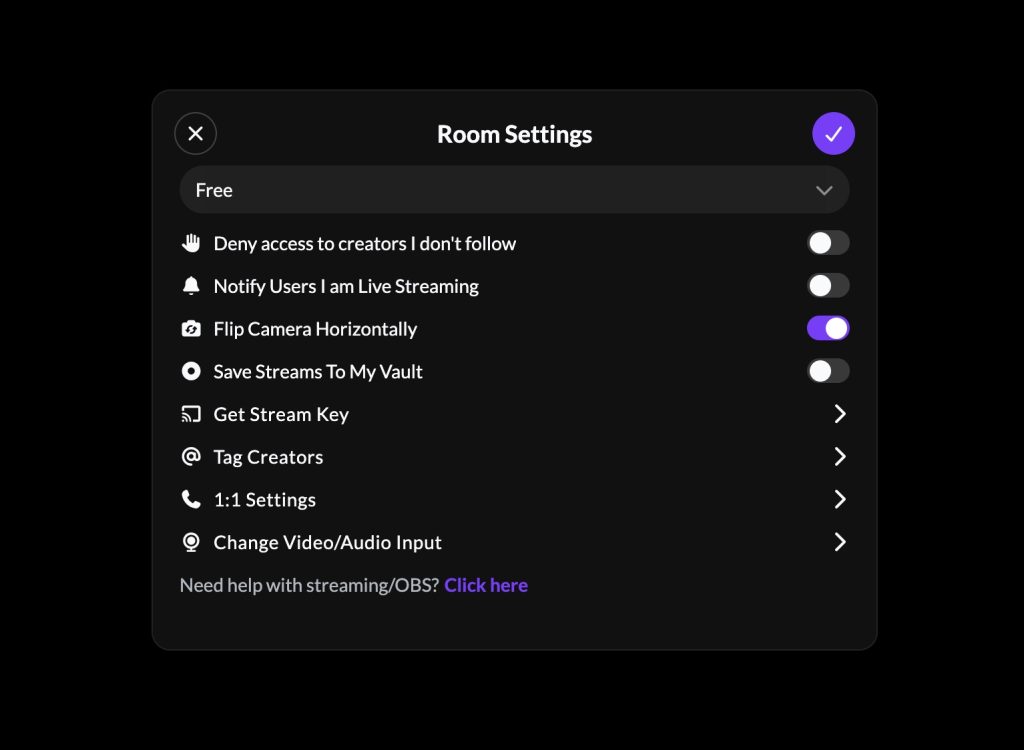
- The Room Settings window opens. Choose who can watch (Free, Subscribers only, Price per minute or Ticket show) and turn on the options you want.
- Click Get Stream Key.
- The OBS Configuration window opens. Here you find your Server Address and your Stream Key. Click the copy icon next to each one to copy it.
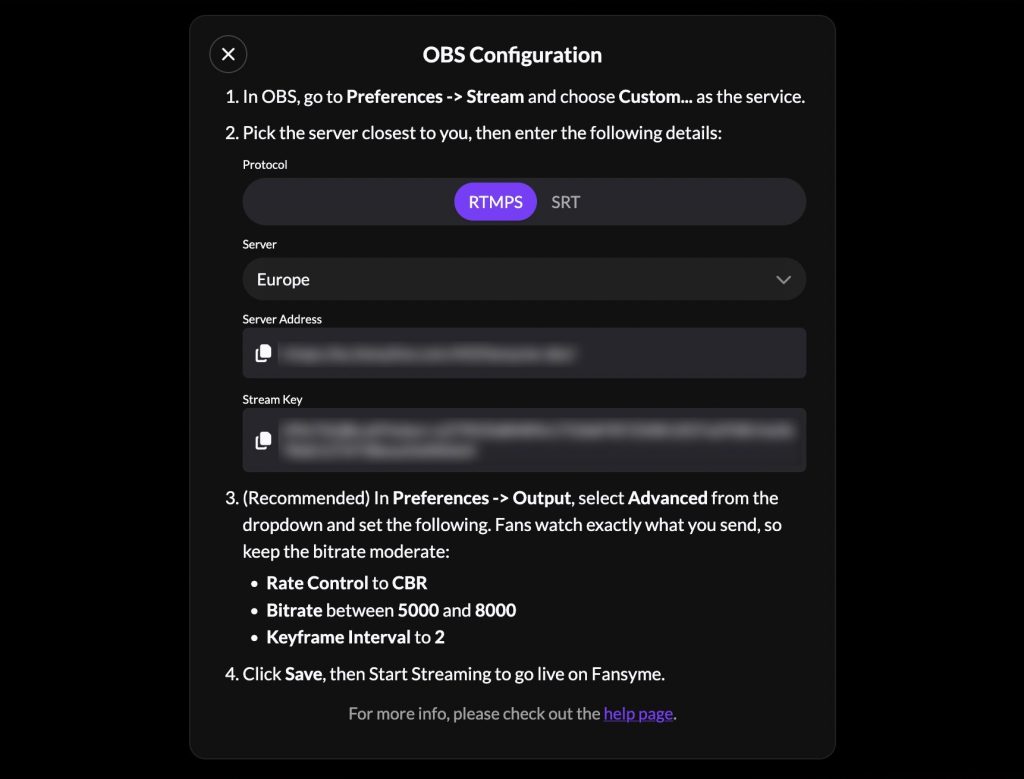
Choose the protocol: RTMPS or SRT #
- RTMPS – Use this one. It works with OBS, SplitCam and XSplit.
- SRT – Still in beta (test phase). Only use it if our support team asks you to.
Choose a server close to you #
The server is the place your video goes to first. A server close to you = less delay and fewer problems.
- Pick the server closest to where you are.
- In the USA? Choose Europe for now. We will add a USA server soon.
Keep your stream key secret. Anyone with your key can stream on your account. Never show it on stream or send it to other people. If someone sees it, contact our support.
Step 2 – Download and install OBS Studio #
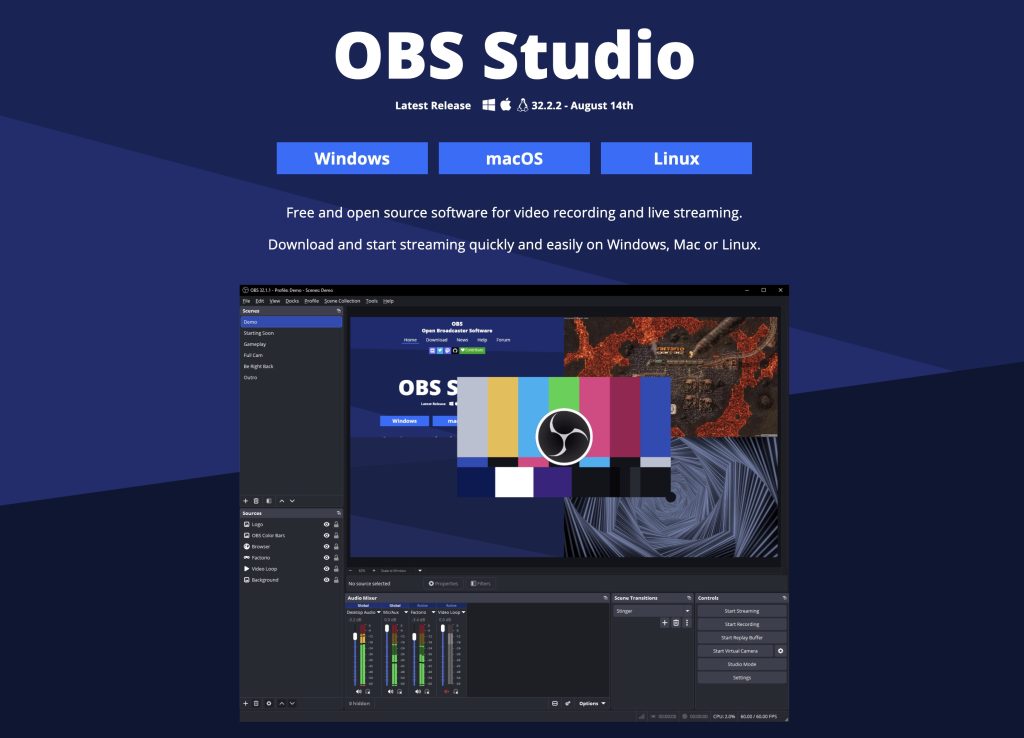
OBS Studio is free. It works on Windows, macOS and Linux.
- Go to obsproject.com/download.
- Click Windows or macOS (the one you use).
- Open the downloaded file and install OBS like any other app.
The first time you open OBS #
- OBS may show the Auto-Configuration Wizard. You can skip it – click Cancel or No. We will set everything by hand in Step 3. It is easy.
- On Mac: macOS asks for permission to use your Camera, Microphone and Screen Recording. Click Allow / OK. If you clicked “Don’t Allow” by mistake, go to System Settings > Privacy & Security and turn them on for OBS.
Add your camera and microphone #
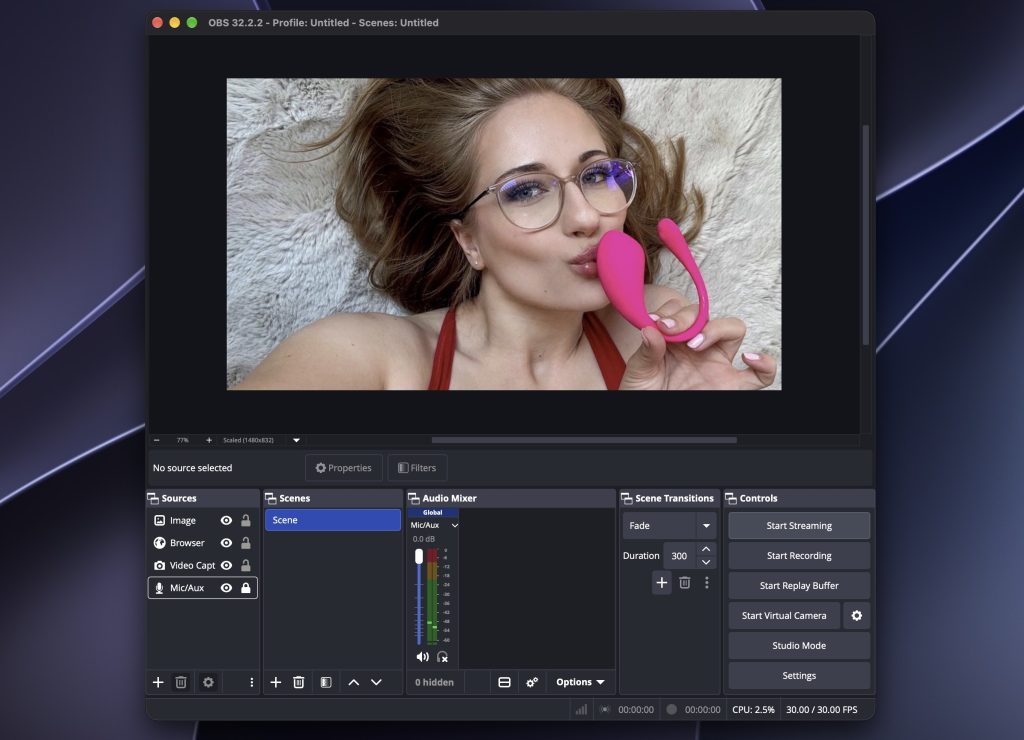
This is the OBS main window. You only need 3 parts:
- The big picture (Preview) – this is exactly what your fans will see.
- Sources (bottom left) – the things in your stream: your camera, your microphone, pictures.
- Controls (bottom right) – here you find Start Streaming and Settings.
A. Add your webcam (camera) #
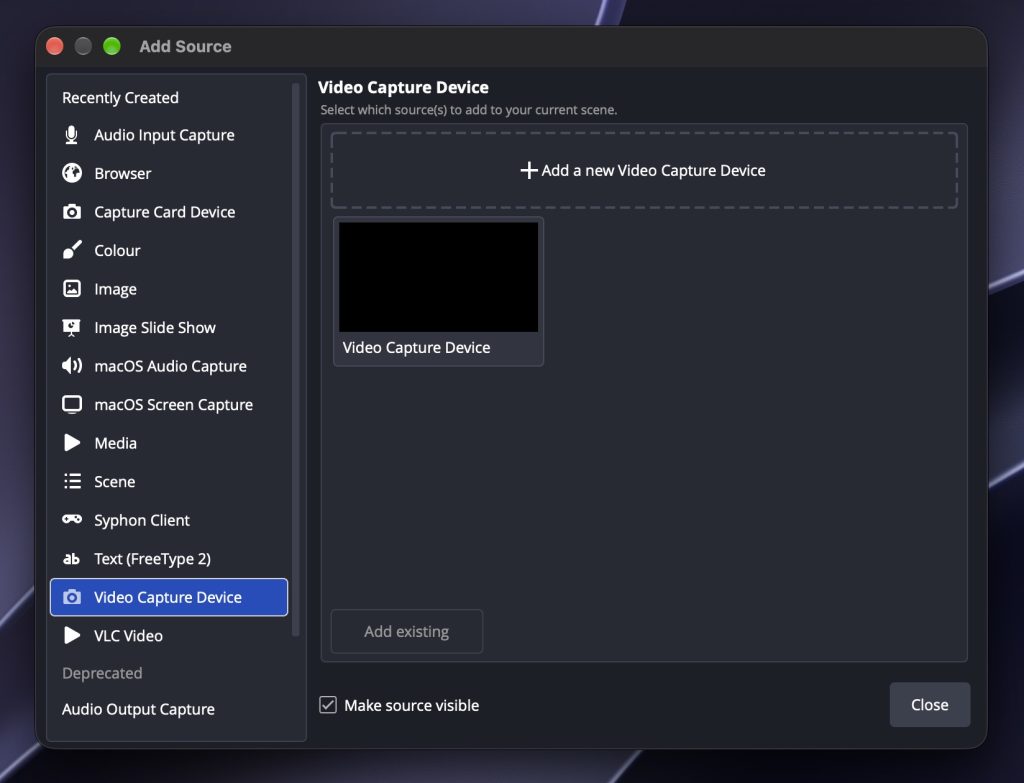
- In the Sources box, click the + button (bottom left).
- A list opens. Click Video Capture Device.
- Click + Add a new Video Capture Device. Give it a name, for example “Webcam”. Click OK.
- A new window opens. At Device, choose your camera from the list. Click OK.
- Now you see yourself in the big picture. Is the camera too small? Right-click on it > Transform > Fit to screen.
B. Add your microphone (sound) #
- Click the + button in Sources again.
- Click Audio Input Capture.
- Click + Add a new Audio Input Capture. Name it “Microphone”. Click OK.
- At Device, choose your microphone. Click OK.
- Now talk. In the Audio Mixer, the bar moves. Green is good. If it goes red, your sound is too loud – move the slider down a little.
Good to know #
- The eye icon next to a source hides or shows it.
- The lock icon stops you from moving it by mistake.
- You only do this one time. OBS remembers your camera and microphone next time.
- Camera stays black? Close other apps that use the camera (Zoom, FaceTime, browser) and try again. On Mac, check the camera permission (see above).
Step 3 – Stream to FansyMe with OBS (solo stream) #
Solo stream = you stream only to FansyMe.
Open the OBS settings #
- Windows: click File > Settings.
- Mac: click OBS Studio > Settings in the top menu bar (in older versions it is called Preferences).
A. Stream settings (where your video goes) #
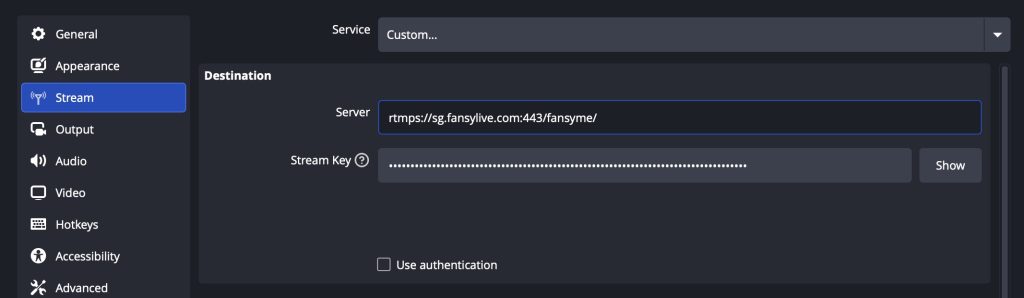
- On the left, click Stream.
- Service: choose Custom…
- Server: paste the Server Address you copied from FansyMe.
- Stream Key: paste the Stream Key you copied from FansyMe.
- Leave Use authentication OFF (not ticked).
B. Output settings (the quality of your video) #
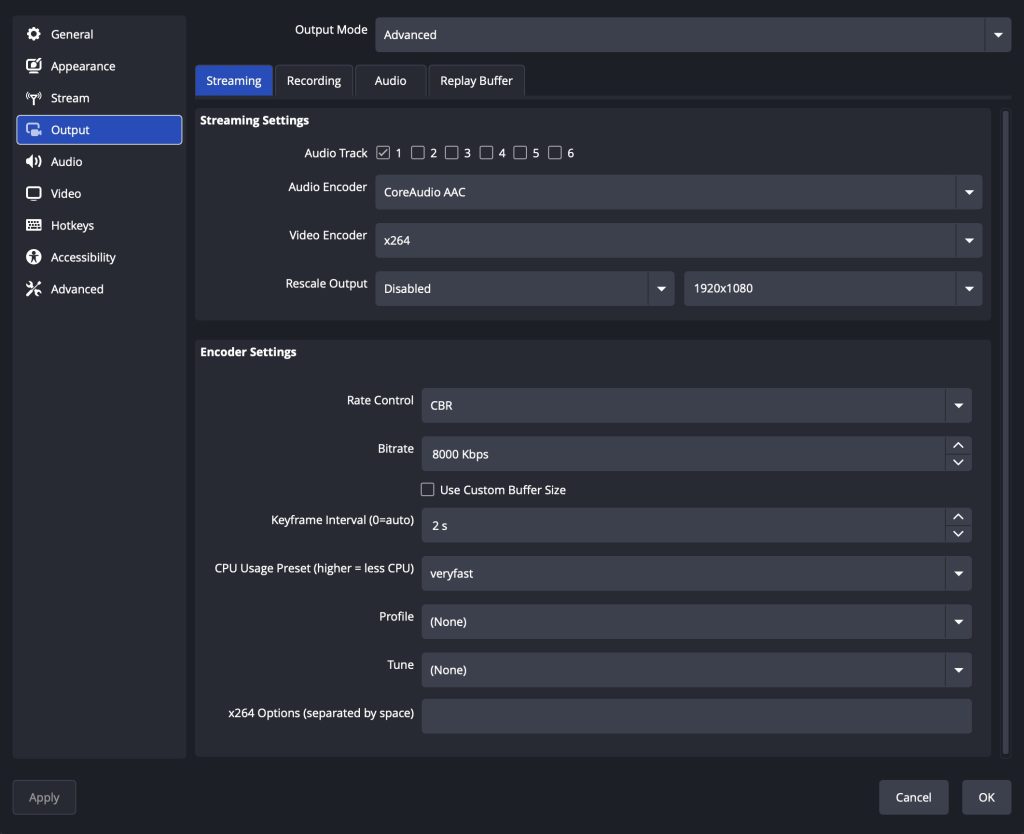
- On the left, click Output.
- Output Mode: choose Advanced.
- Click the Streaming tab and set:
- Rate Control: CBR
- Bitrate: 5000 to 8000 Kbps (use 2500-3000 if your internet is slow)
- Keyframe Interval: 2 s
- CPU Usage Preset: veryfast
- Leave the other options as they are.
Do not go higher than 8000 Kbps. Your fans watch exactly what you send. A too-high bitrate can make the stream freeze or disconnect.
Tip: If your computer gets slow or hot, change Video Encoder from x264 to a hardware encoder. On Mac choose Apple VT H264 Hardware Encoder. On Windows choose NVIDIA NVENC or AMD (if you have one).
C. Go live #
- Click Apply, then OK.
- In the OBS main window, click Start Streaming (bottom right).
- Open FansyMe and check that you are live. Done!
To stop, click Stop Streaming in OBS.
Multistream with OBS + Aitum Multistream (free) #
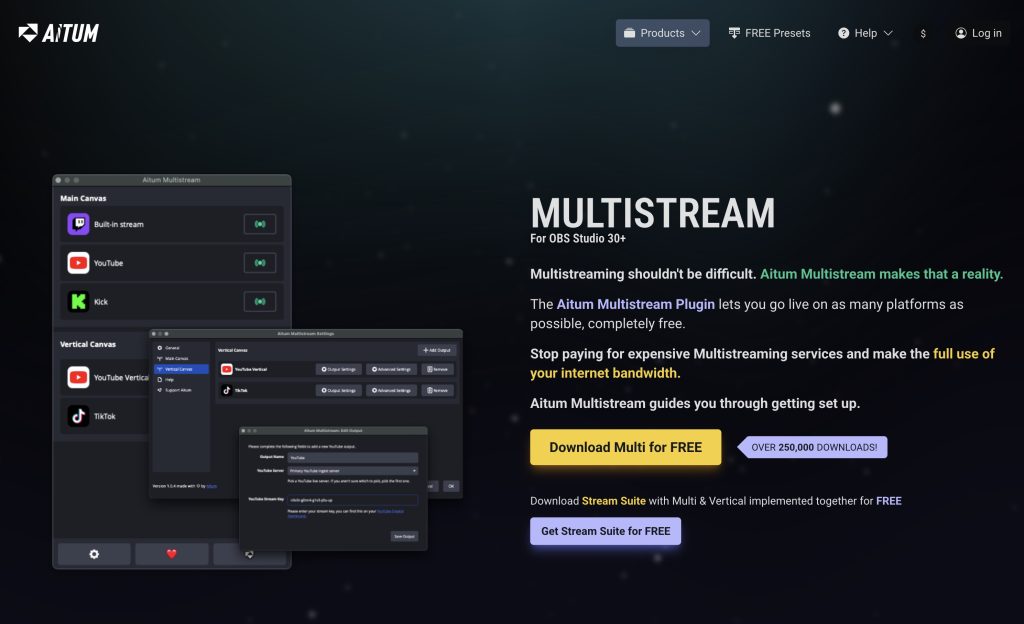
Multistream = you stream to FansyMe and other sites at the same time (for example X, Twitch, YouTube, Kick). OBS cannot do this alone, so you add a free plugin called Aitum Multistream.
Important: each extra site uses more upload speed. 3 sites x 6000 Kbps = 18 Mbps. Check your speed first on speed.cloudflare.com.
A. Install the plugin #
- First, finish Step 3 above. FansyMe must already work in OBS.
- Close OBS.
- Download Aitum Multistream from aitum.tv/multi (also on the OBS forum page). Choose the file for Windows or macOS. You need OBS 30 or newer.
- Open the file and install it.
- Open OBS again. You now see a new Aitum Multistream box (dock). If you don’t see it, see “Show the Aitum box” below.
Show the Aitum box (dock) #
- In the top menu, click Docks.
- Click Aitum Multistream so it has a check mark.
- The Aitum box may appear floating somewhere on your screen. Just drag it (click and hold its title bar) onto the OBS window. It snaps into place. You can put it anywhere you like, for example next to Scenes.
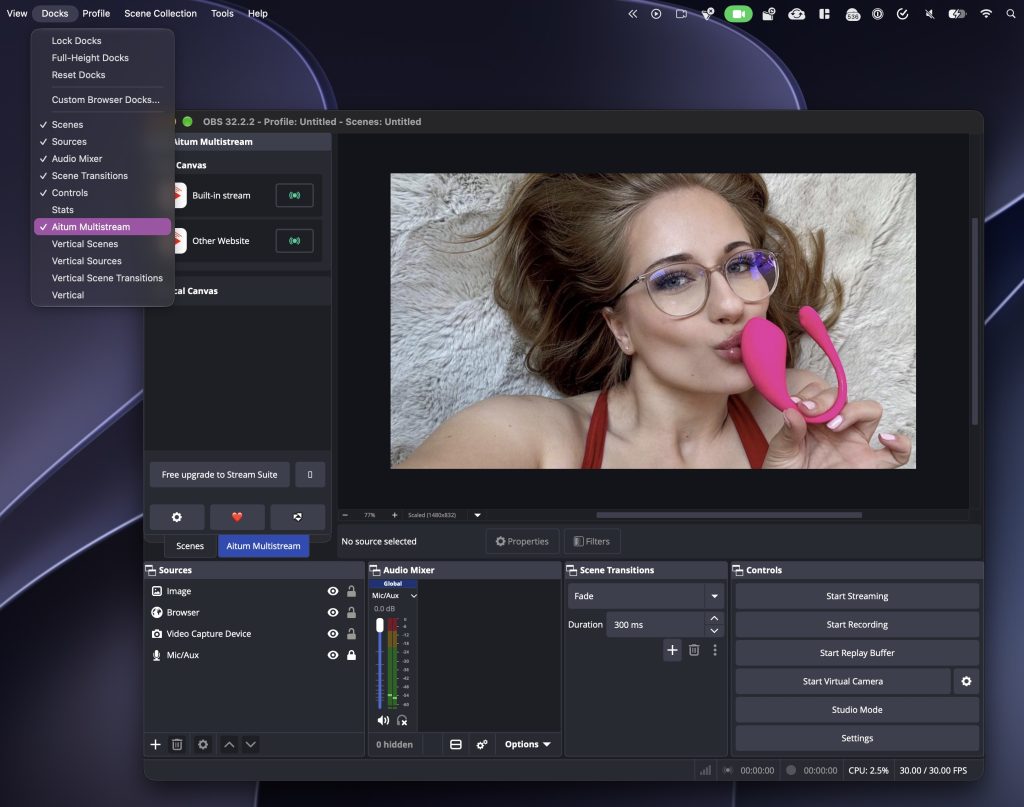
Your screen may look a little different. This depends on your computer (Mac or Windows) and your OBS version. The buttons have the same names.
B. Add your other sites #
- In the Aitum Multistream box, you see Built-in stream. This is your normal OBS stream = FansyMe. Do not change it.
- Click the gear icon (settings) at the bottom of the box.
- Click Main Canvas, then Add Output.
- Choose the site (or Custom if it is not in the list).
- Paste the Server and Stream Key from that other site. Click Save Output.
- Repeat for every site you want. Click OK.
C. Go live everywhere #
- Click Start Streaming in OBS. This starts FansyMe.
- In the Aitum box, click the broadcast button next to each other site to start it.
- Check FansyMe and the other sites. You are live!
Remember: when you stream with other people, tag them in FansyMe Room Settings. You may only stream with verified creators or co-creators.
Other apps: SplitCam and XSplit #
Don’t like OBS? These apps also work with FansyMe. You use the same Server Address and Stream Key from Step 1.
| App | Computer | Price | Multistream |
|---|---|---|---|
| OBS Studio | Windows, Mac, Linux | Free | Yes, with free Aitum plugin |
| SplitCam | Windows, Mac | Free | Yes, built in, free |
| XSplit Broadcaster | Windows only | Free version has limits | Only with Premium (paid) |
SplitCam #
SplitCam is easy for beginners and can multistream for free.
- Download and install SplitCam from splitcam.com/download.
- Open SplitCam and add your camera.
- Click Stream Settings (top right), then Add Channel.
- Choose Custom RTMP. Give it a name, for example “FansyMe”.
- Server: paste the Server Address from FansyMe.
- Stream Key: paste the Stream Key from FansyMe. Set the bitrate to 5000-8000.
- Multistream: add more channels the same way for other sites.
- Click Go Live.
XSplit Broadcaster (Windows only) #
- Download and install XSplit from xsplit.com/broadcaster.
- Open XSplit and add your camera.
- Click Broadcast > Set up a new output > Custom RTMP.
- Name: for example “FansyMe”.
- RTMP URL: paste the Server Address from FansyMe.
- Stream Key: paste the Stream Key from FansyMe. Click OK.
- Click Broadcast > FansyMe to go live.
Note: the free XSplit version adds a watermark above 720p and 30 fps. Multistream (more than one output at the same time) needs XSplit Premium. (XSplit prices)
Problems? Quick fixes #
| Problem | What to do |
|---|---|
| OBS says “Failed to connect” | Copy the Server Address and Stream Key again from FansyMe. Check there are no spaces at the start or end. |
| Stream freezes or stops | Lower the bitrate (for example 4000 or 3000). Use a cable instead of Wi-Fi. |
| Long delay or lag | Choose a server closer to you. In the USA, choose Europe. |
| Computer is slow or hot | Use a hardware encoder (see the tip in Step 3). Set CPU Usage Preset to veryfast or superfast. |
| Black screen in OBS (Mac) | Allow Camera and Screen Recording for OBS in System Settings > Privacy & Security. Restart OBS. |
| Multistream drops | Your upload speed is too low for all sites. Stream to fewer sites or lower the bitrate. |
Still need help? Run the test at speed.cloudflare.com, take a screenshot of the result and send it to our support together with a short description of the problem.
Download links #
| What | Link |
|---|---|
| OBS Studio (Windows, Mac, Linux) | obsproject.com/download |
| Aitum Multistream plugin for OBS | aitum.tv/multi or OBS forum page |
| SplitCam (Windows, Mac) | splitcam.com/download |
| XSplit Broadcaster (Windows) | xsplit.com/broadcaster |
| Internet speed test | speed.cloudflare.com |